How to Connect ShipStation to ShipSavvy
Bring your ShipStation orders into ShipSavvy automatically, with no retyping.
- Overview
- Before you start
- Step 1: Get your ShipStation API key
- Step 2: Connect ShipStation in ShipSavvy
- Step 3: Choose which stores to link
- Step 4: Your orders arrive in ShipSavvy
- Step 5: Ship an order
- Step 6: Tracking goes back to ShipStation
- Pull in new orders with Manual Sync
- See orders from one store
- Remove a store
- Troubleshooting and help
Overview
Connecting ShipStation to ShipSavvy means your orders show up in ShipSavvy on their own, so you never have to retype them. Once the two are linked, ShipSavvy brings in your ShipStation orders, helps you pay for shipping and print labels, and sends the tracking number back to ShipStation for you.
Setup takes a few minutes, and this guide walks you through each click. Look for the video link in each step if you'd rather watch than read.
Before you start
You'll need two things, and both are easy to line up.
- A ShipStation account and a ShipSavvy account. You'll move between the two during setup, so it helps to have each open in its own browser tab.
- Access to your ShipStation “API key.” An API key is a private code that lets two apps talk to each other. Think of it as a house key you hand to ShipSavvy so it can pick up your orders. ShipStation only lets the account owner create one, so if that isn't you, ask your account owner to follow Step 1 and send you the code.
Step 1
Get your ShipStation API Key & API Secret
You create your key inside ShipStation, in about a minute.
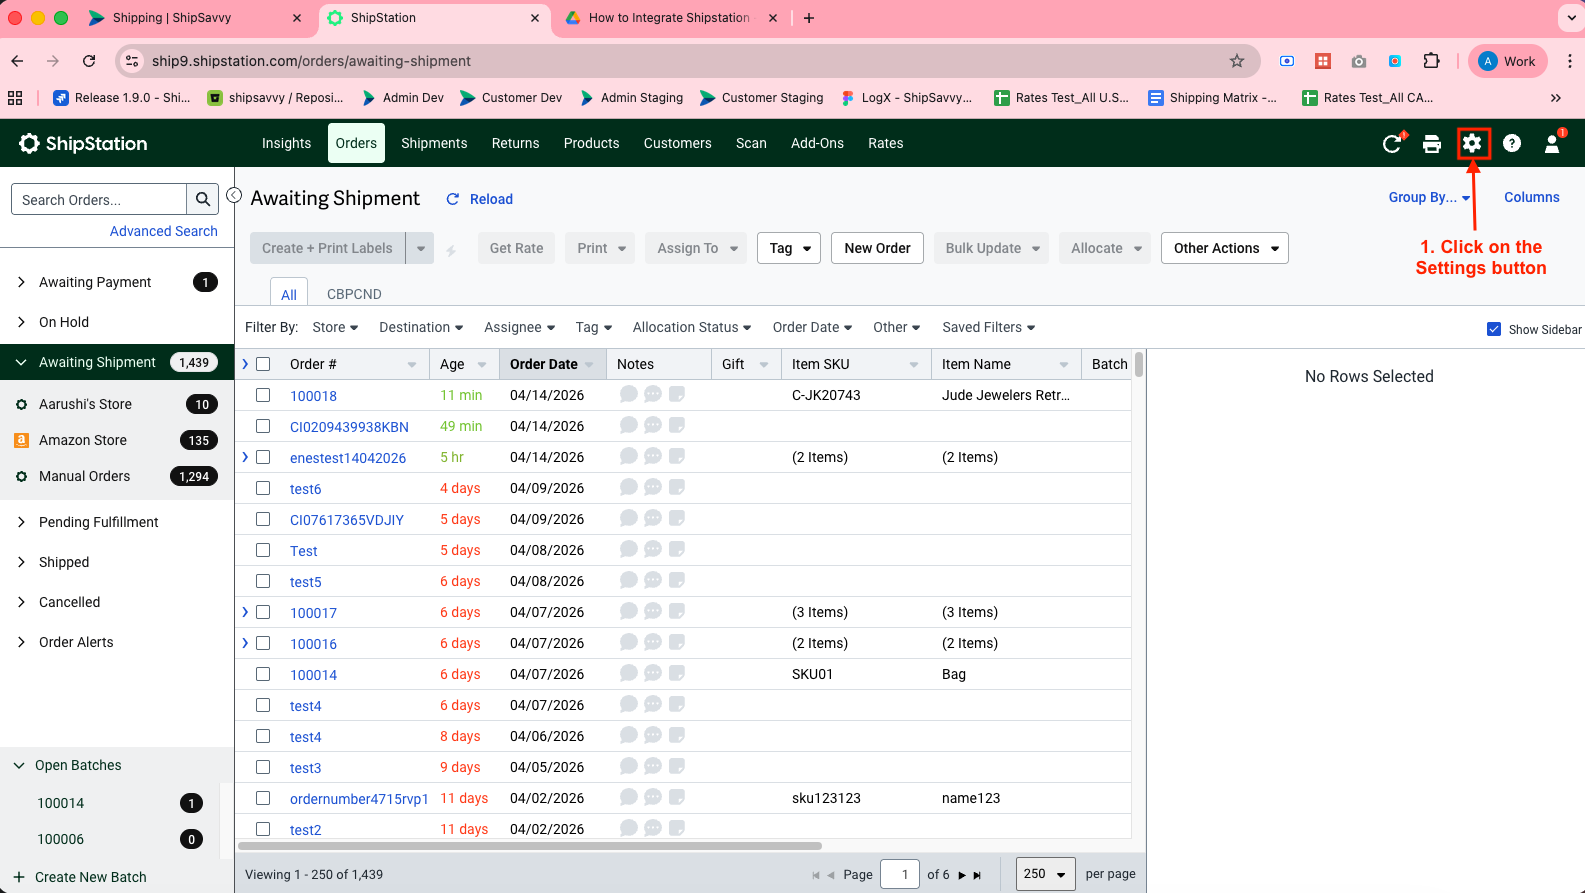
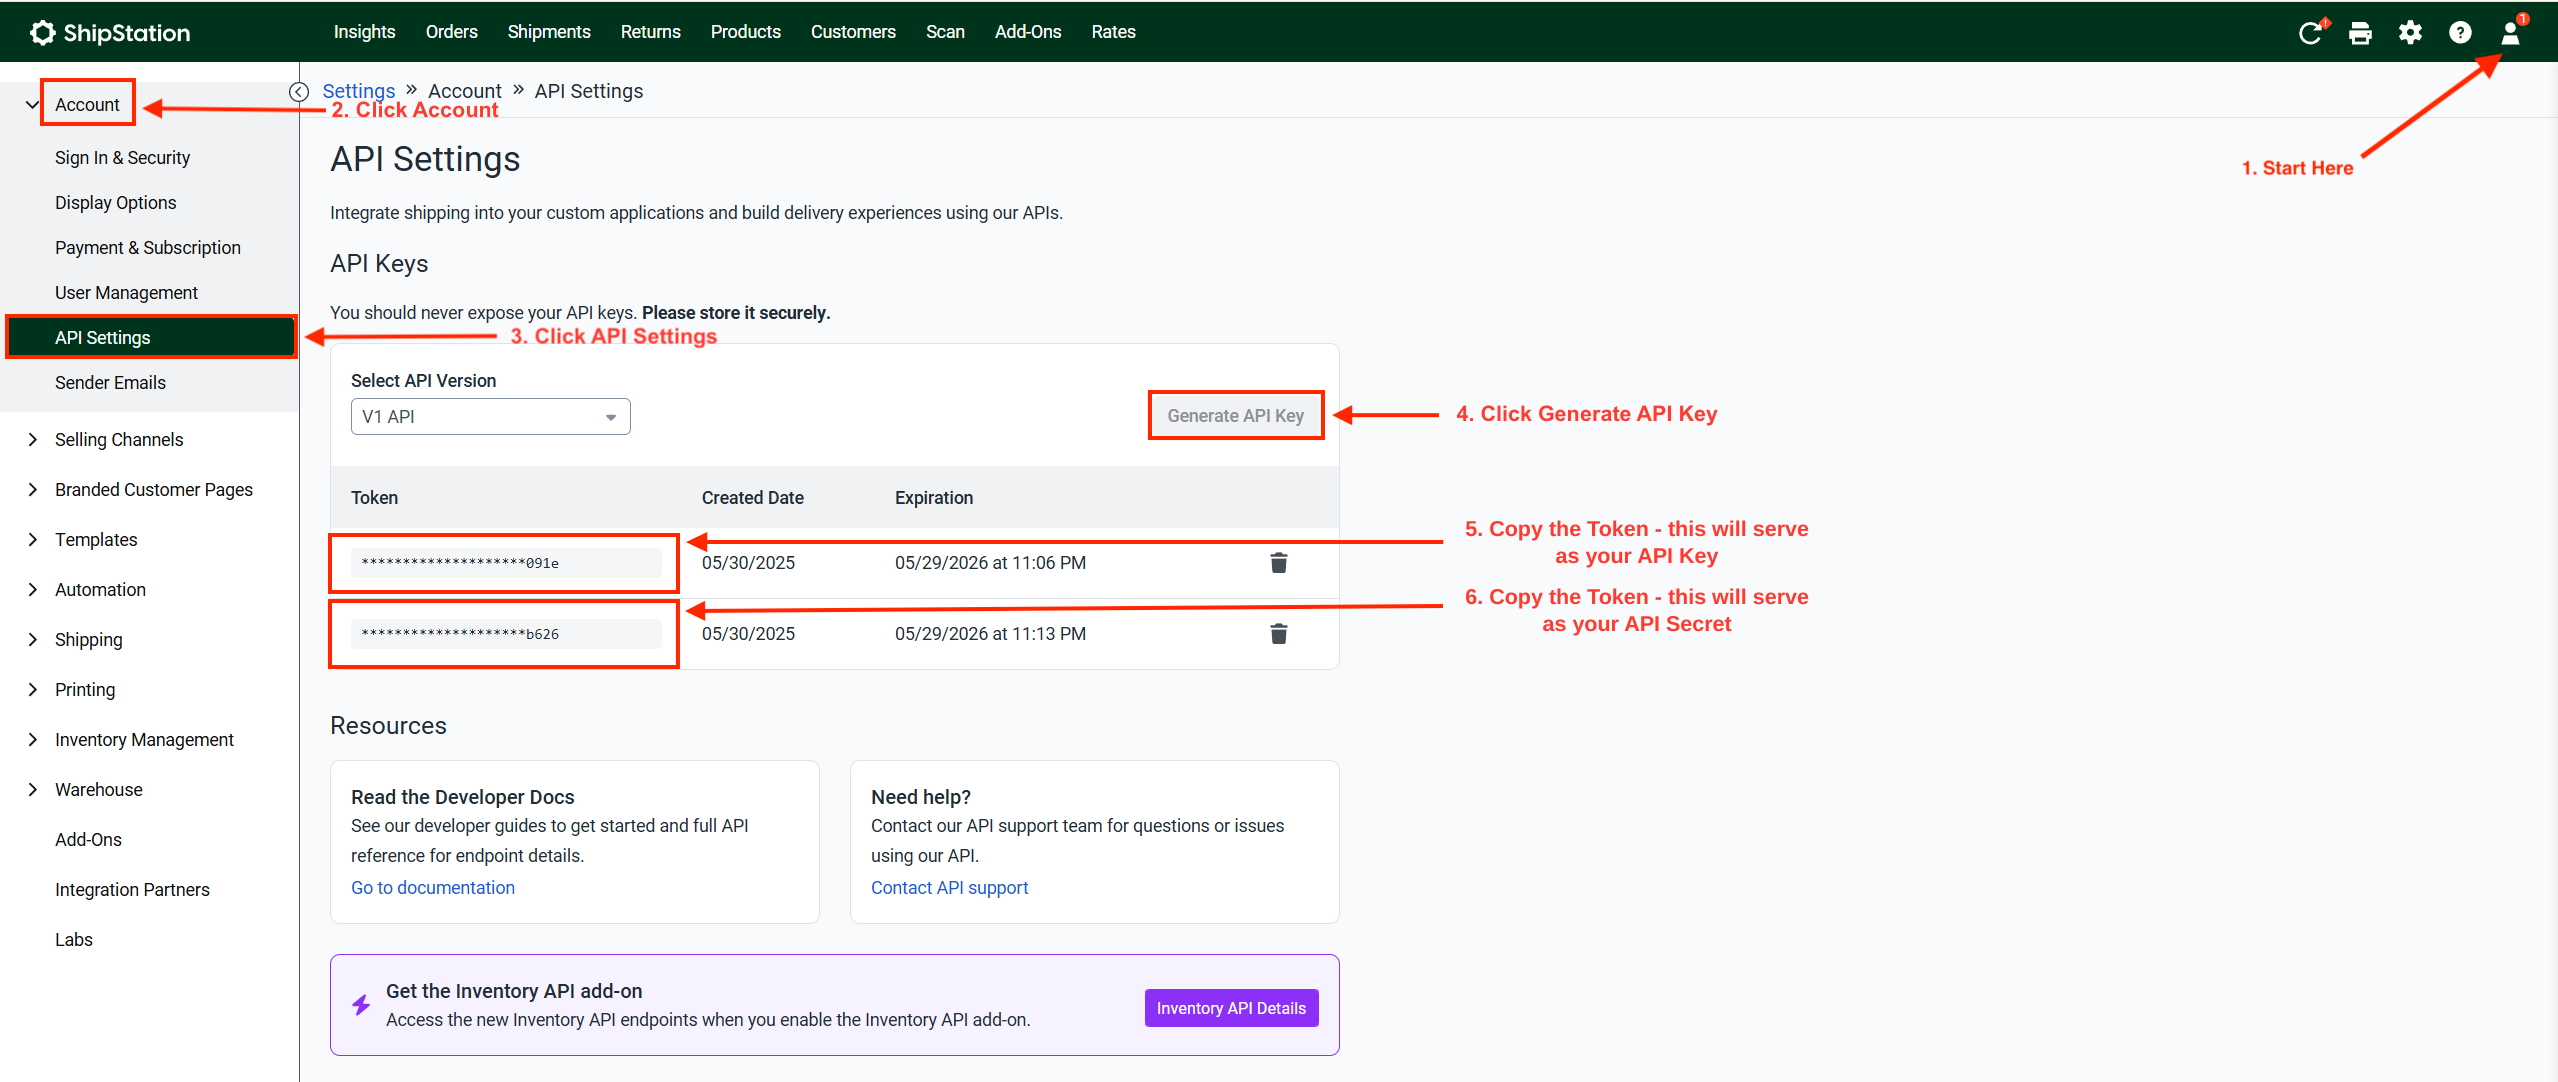
- Sign in to ShipStation and click the gear icon (Settings) at the top right.
- In the menu on the left, click Account.
- Click API Settings.
- Click Generate API Key. (API Key and API Secret will be generated)
- Copy the Token that appears. This is the “API Key” ShipSavvy will ask for.
- Copy the second Token. This will serve as your API Secret.
Step 2
Connect ShipStation in ShipSavvy
Now you'll hand your key to ShipSavvy.
- Sign in to ShipSavvy and click Integrations in the menu on the left.
- Click + Connect Store at the top right.
- Find the ShipStation option and click Connect.
- In the pop-up, paste your API Key and API Secret into the two boxes.
- Click Connect. The button turns green once both boxes are filled in.
Step 3
Choose which stores to link
A “store” is simply a sales channel set up in ShipStation, like your online shop or manual orders. You decide which ones ShipSavvy should pick up orders from.
- Right after you connect, a pop-up titled Select ShipStation stores to link appears with a list of your ShipStation stores.
- Tick the box next to each store you want to connect.
- Click Link Stores. The button turns on once you've ticked at least one.
Step 4
Your orders arrive in ShipSavvy
After setup, new ShipStation orders flow into ShipSavvy automatically. You'll find them under Shipping in the left menu.
Each order shows a status so you know what to do next:
- Pending Payment means the order is ready. You just need to choose a shipping service and pay (Step 5).
- Incomplete means ShipSavvy needs a little more information before it can ship the order. Click the pencil icon on that row to fill in what's missing.
In a hurry for a new order? You can pull orders in right away with Manual Sync (see below).
Step 5
Ship an order
Shipping an order takes five short stops: review it, check out, pick a service, pay, and print your label. A “label” is the sticker with a barcode that goes on your package. Refer to the video above.
- On the Shipping page, click the pencil icon on the order. Check the delivery address, the package weight and size, and the product details.
- Tick the box next to the order, then click Checkout at the bottom right. ShipSavvy checks shipping rates for you.
- Choose a shipping service. Each option shows the carrier, the delivery time, and the price. You can sort by Lowest Cost or Fastest. Then click Pay Now.
- On the checkout page, confirm your payment method and click Complete Payment. Stay on the page for a moment while your labels are created.
- On the Payment Successful page, choose Download Receipt, Download All Labels, or View Label Ready Page.
Step 6
Tracking goes back to ShipStation
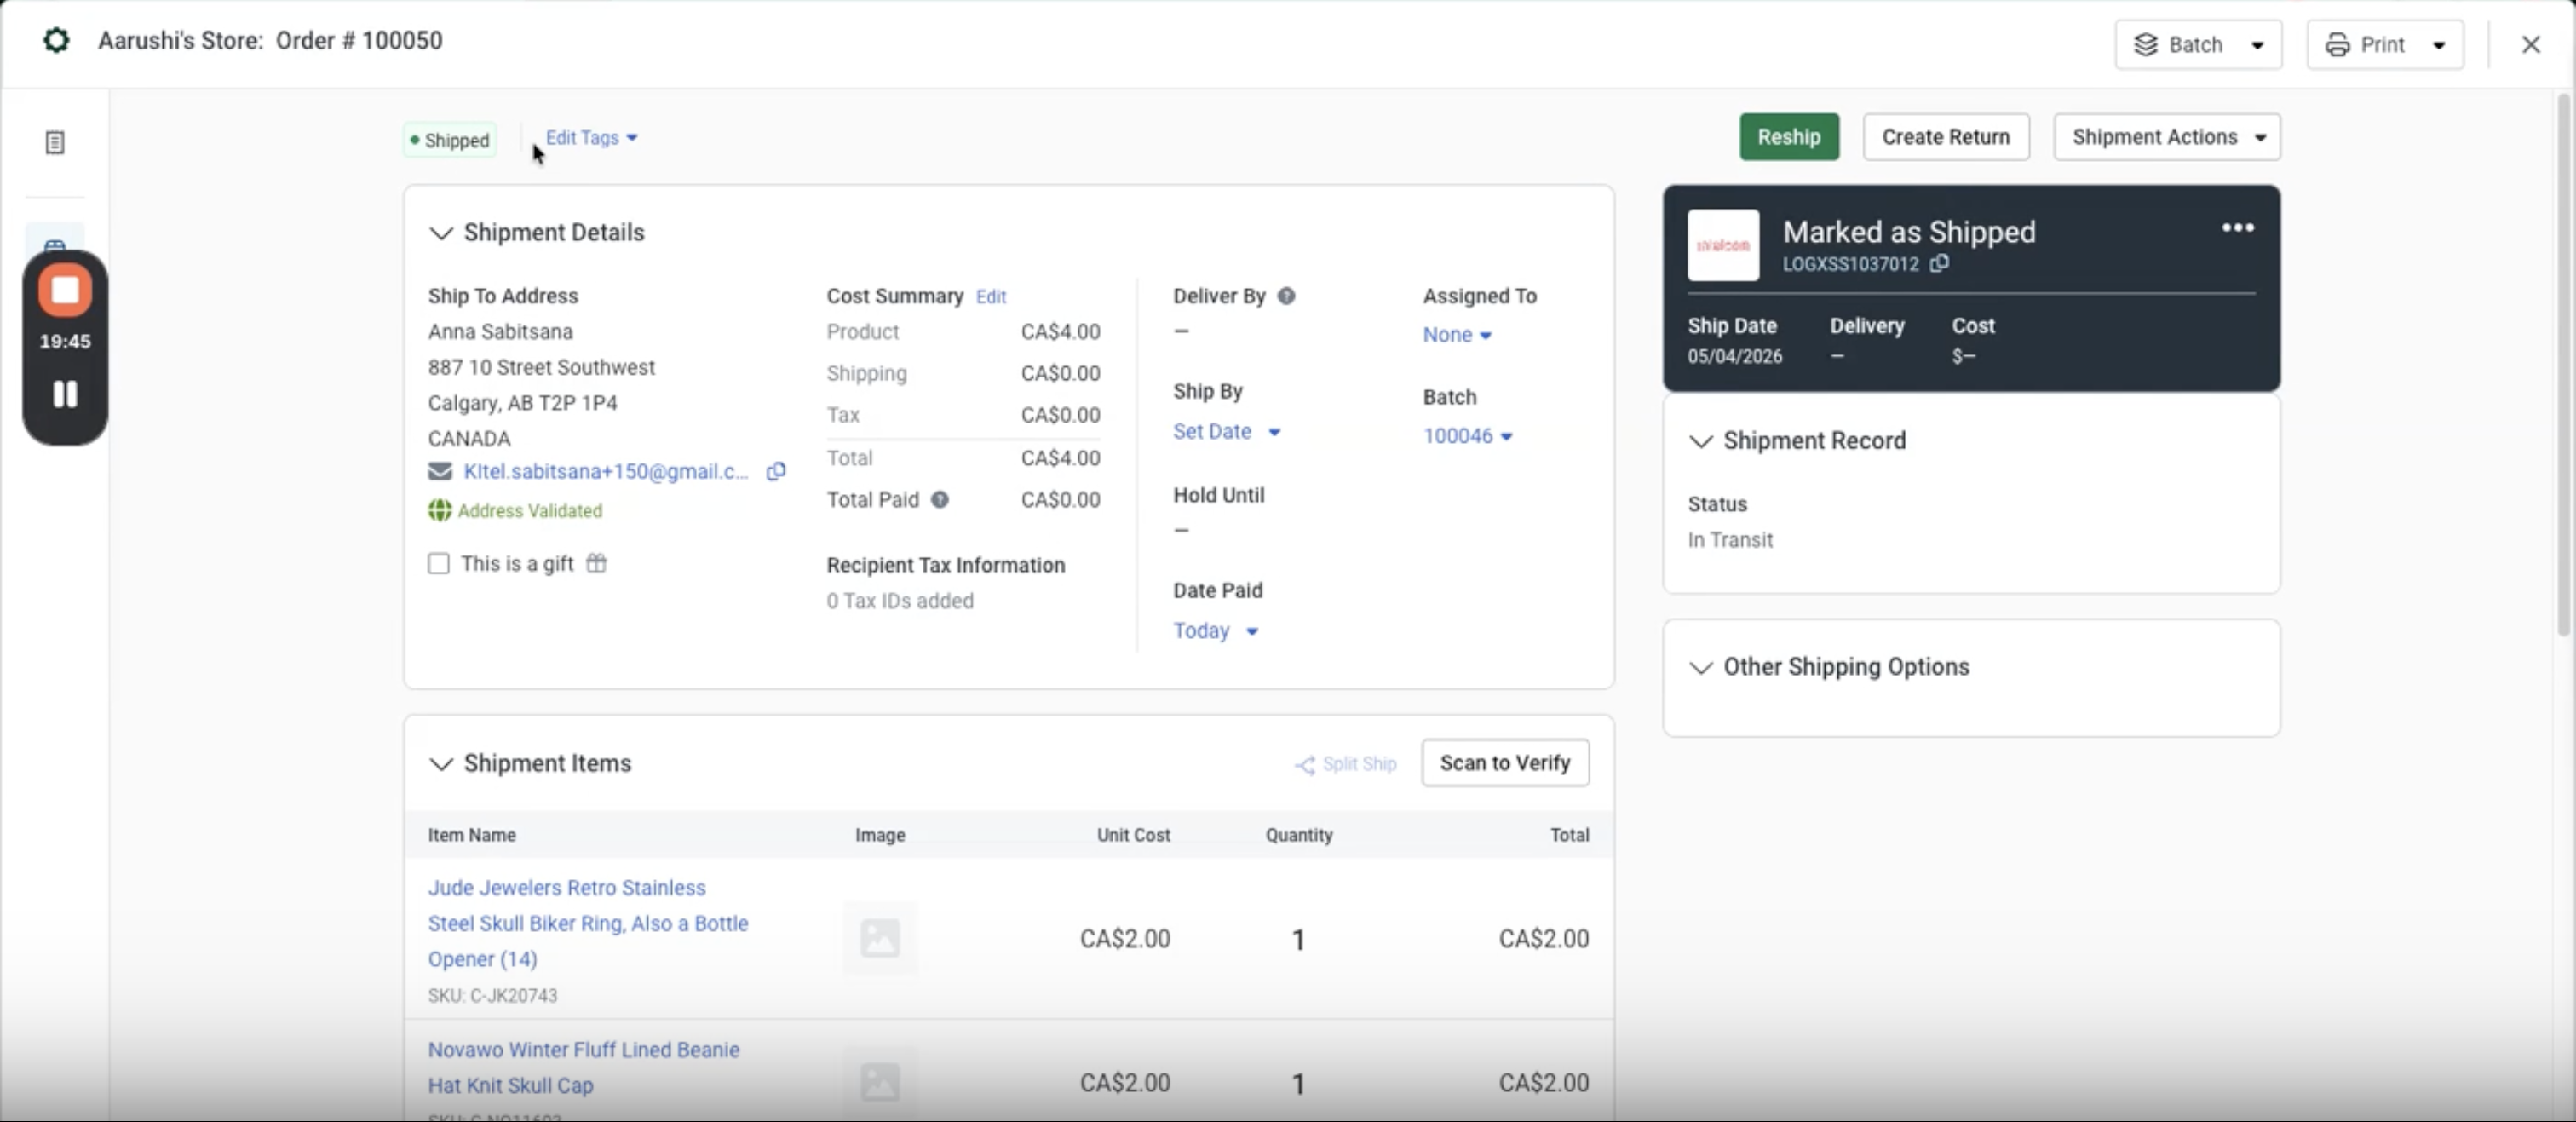
There's nothing to do here. Once your label is created, ShipSavvy sends the tracking number to ShipStation for you, and the order is marked as shipped.
To see it, open the order in ShipStation. You'll find a “Marked as Shipped” box with the tracking number and a status of “In Transit.” If the order still looks unchanged, click Reload in ShipStation to refresh the list.
Extra
Pull in new orders right now with Manual Sync
Manual Sync tells ShipSavvy to check ShipStation for new orders immediately, instead of waiting for the automatic check.
- Click Integrations in the left menu.
- Find your ShipStation store. In the Actions column, click the circular arrows icon. Hover over it and you'll see “Manual Sync.”
- Wait for the green message: “Linked stores synchronized successfully.”
- Click Shipping to see your new orders.
Extra
See orders from one store with filters
If you've linked more than one ShipStation store, you can show just one store's orders at a time.
- Click Shipping in the left menu.
- Click the funnel icon at the top of the page to open the filters.
- Under By Integration Store, choose your store from the drop-down.
- Click Apply.
You can add other filters too, such as date range, destination, carrier, or order status. A small red dot on the funnel icon tells you a filter is on. Click Clear to see everything again.
Extra
Remove a store
If you no longer want a store connected, you can remove it in a few clicks.
- Click Integrations in the left menu.
- Find the store, then click the trash can icon in the Actions column.
- A pop-up asks, “Are you sure you want to delete store?” Click Delete to continue, or Cancel if you changed your mind.
You'll see “Store deleted successfully.” If you ever want to reconnect, click + Connect Store and follow Steps 2 and 3 again.
Troubleshooting and help
Most hiccups have a quick fix. Try these first.
- Can't connect? Go back to ShipStation and copy your key again, then paste it into ShipSavvy. Make sure no extra spaces came along. If you can't generate a key, ask your ShipStation account owner.
- Don't see an order? Click the Manual Sync icon on the Integrations page. Also check that you linked the right store, and that no filter is hiding it (a red dot on the funnel icon means a filter is on).
- Order says Incomplete? Click the pencil icon on that order and fill in anything that's missing.
- Tracking isn't showing in ShipStation? Check that your order shows Label Created in ShipSavvy, then click Reload in ShipStation.
Was this article helpful?
That’s Great!
Thank you for your feedback
Sorry! We couldn't be helpful
Thank you for your feedback
Feedback sent
We appreciate your effort and will try to fix the article